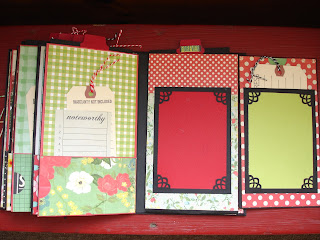
This is an envelope mini using black Recollections envelopes from Michael's, with a hidden hinge system of binding and chipboard covers made with Crate Paper collection called DIY Shop. I found this paper on sale last week at a Big Lots store. Hey, I'll take it! I think this one should go to a local raffle at our local school. It's got lots of tags, as you can see in the first photo and the paper collection came with some good cut-outs for embellishing.
As always, thanks for looking!
Thursday, September 26, 2013
Saturday, September 14, 2013
7 Gypsies Camden mini album
Magnetic closure is used on the front cover of this 7 Gypsies Camden paper 8 3/4 x 9 1/4 book. I used a lot of shipping tags and put in lots of flaps, cause that's what I like to do, and the edges of the pages are all paper punched with different punch designs. It has a lot of pages, but here are just a few ...
 |
| The little booklet below is magnetized onto the page above and comes off so that a large photo can go behind it. The booklet will hold 7 photos. |
As always, thanks for looking.
DCWV Linen Closet envelope mini
Talk about quick...I started this after lunch and had it done in time to make dinner. This mini is made with Kraft card envelopes and the flaps are made by simply inserting the cards that come with the envelopes. I saw a short video posted on Pinterest by scrapbookgirl.typepad.com for this and then ran with it. The only thing I did differently was to add a chipboard cover. To do that I added a piece of kraft paper cut to the size of the spine of the grouped envelopes plus an inch on either side so I could make some side flaps to use with a stack the deck method. I didn't do any embellishing since I really just wanted to test this envelope method out.
DCWV Natural Stack One and Done mini album
This is a fast little mini album to make...as long as you don't put it in a craft closet, half-done, and then take it out a year later. Just saying. Really though, if you need to make a quick little gift for someone this one goes together very quickly. The binding method is Stack the Deck from Laura Denison and the paper, which I've had for quite some time now, is the Natural matstack by DCVW with "foil and eluminaire". And you can see by the first photo that it certainly has some luminary qualities. (Sunglasses not included :). The style is called One and Done and tutorial videos can be found on youtube.com.The size of this mini works great with the 4 1/2 x 6 1/2" paper pack. The front flap is magnetized, and each inner page has a flap as well.
 |
Wednesday, August 21, 2013
Antique Paperie Mini
An 8x8 paper pad by Colorbok called Antique Paperie caught my eye at a CHA a few years ago and the colors matched perfectly to the Easy Breezy collection of papers by The Paper Loft. I added a few sweet antique postcards and a couple of papers from My Minds Eye and October Afternoon. A chipboard cover, stack the deck binding, some flips and flaps and tags and a lot of TLC and wallah!
Thanks for looking!
Thanks for looking!
Monday, July 22, 2013
For the Record Mini Album
I've used this paper before on another project but it seemed fitting for this little mini for my niece who is packing up and moving a long distance away from friends and family. This paper is by Echo Park and is called For the Record. I used the front page of the packaging for the title and added some chipboard behind "the news". I made a pocket to hold the tags so her friends can journal their thoughts at her going away party. And there's plenty more tags inside too. (She has a LOT of friends.) And plenty of photo mats to document her send-off.
 This is a vertical paperbag album made by the instructions from mysisterscrapper channel on youtube. I've used that in another project as well and found it very easy to follow.
As always, thanks for looking.
 This is a vertical paperbag album made by the instructions from mysisterscrapper channel on youtube. I've used that in another project as well and found it very easy to follow.
 |
| Each page has a flap |
 |
| and each page has a photo mat pull-out. |
 |
| The binding method is the "stack the deck" by Laura Denison |
As always, thanks for looking.
Friday, March 22, 2013
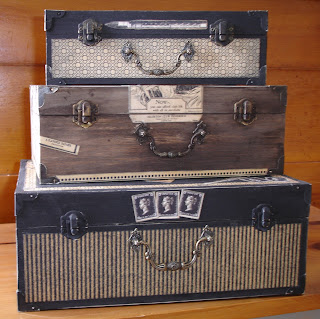
Graphic 45 style nesting wooden box set
 I always need storage for my craft supplies. So last year I bought these wooden nesting boxes at Hobby Lobby....($20.00 for a set of three with the bronze hardware included). Since we don't have a Hobby Lobby anywhere near us I try to pick up everything I think would make a good project whenever we're near one. So sometimes I have a tendency to pick up more than I have time to work on in a year, in a craft frenzy sort of way. You follow me? And then, of course, I feel guilty and overwhelmed when I open up my closets and there's all this stuff just waiting on me.....anyways, there comes a point when you can't fit anymore into the closet and, well, you get the picture. So, it's time to catch up. The good part now is that now I can actually use these to store things out on a shelf. (I'll try not fill up the space they left in the closet.) Okay, so I thought they might look cute made up like old traveling trunks. I used a combo of papers from different Graphic 45 collections that I had left over. I removed only the front hardware and I painted two boxes black and one a raw umber brown wash, after sanding them down with a light grit sandpaper. Then sanded them back a bit when the paint was dry for a little worn look. I fussy cut some of the graphics and and papers for the trim and Mod Podged them on to the boxes. Since I wanted them to stack well on top of each other I kept it simple and left off any further embellishments.
 |
| small box |
 |
| front view |
 |
| medium box |

 |
| large box |
 |
| front view Now I'll sign off and go fill them up! Thanks for looking! |
Subscribe to:
Posts (Atom)


